How to run multiple Spacemesh nodes in MacOS, using a cloud provider to create your postdata
21 December 2023
In this article, I will describe:
- How I originally ran four Spacemesh nodes on a Mac Mini, under MacOS Sonoma.
- How I used a cloud GPU platform to create my postdata.
- Switched to a setup involving one Public node, and three Private nodes.
- Finally, switched to a setup involving only one node, managing four postdata sets.
Table of contents:
- What is Spacemesh?
- What is a Spacemesh node?
- My computers
- Directory structure
- Creating postdata using a cloud provider
- Node startup scripts
- Starting your nodes
- Monitoring your nodes
- Log rotation
- Public & Private node setup
- Running a single node with go-spacemesh 1.4
- Costs
- Final thoughts
- Acknowledgements
- Additional reading & resources
What is Spacemesh?
Spacemesh is an emerging Layer-1 blockchain that launched its mainnet in July of 2023. If there’s still space for another L1 in crypto, I believe Spacemesh is uniquely positioned for the following reasons:
- Its consensus mechanism—Proof-of-Elapsed-Time (PoET) combined with Proof-of-Space-Time (PoST)—is designed to support decentralization similar to Bitcoin, in that anyone wishing to run a node (validator) can do so on everyday home computer equipment, and will earn their pro-rata share of rewards.
- A virtual machine will support smart-contracts, making Spacemesh a global computer, similar to Ethereum, on which businesses can build and bring users, hopefully creating the network effect needed to create the flywheel of long-term success.
- Its tokenomics is modeled after Bitcoin, but with a relatively small percentage allocated to the founding team and investors.
The coin/token of the protocol is SMH.
So imagine an L1 protocol that’s as decentralized as Bitcoin, is a global computer like Ethereum, and with great tokenomics. That gets me excited!
What is a Spacemesh node?
The Spacemesh consensus mechanism is based on two protocols, “Hare” (the organization of “layers”, containing blocks of transactions) and “Tortoise” (the ultimate ratification of the blockchain state.) Running Tortoise is referred to as “smeshing”.
Spacemesh nodes can participate in either protocol, or both. However, only Tortoise participants—”smeshers”—earn SMH rewards, by permanently dedicating disk space, called “postdata”, the space and provided-time of which can be cryptographically proven.
The project offers the following software for running nodes:
- go-spacemesh (Hare & Tortoise) — Low-level software operated from a command-line interface (CLI).
- Smapp (Hare, Tortoise and Wallet) — A user-friendly GUI application, that has
go-spacemeshbuilt in (for running Hare & Tortoise), and can additionally manage a self-custodial wallet for receiving, holding and sending SMH. - postcli — Another low-level software for validating ad working with “postdata”.
My computers
My Spacemesh setup is as follows:
- Mac Mini running three nodes — I have a 2023 Mac Mini, with the M2 Pro CPU/GPU processor, 32GB of memory, and three small Samsung T9 4TB SSD external drives attached. This computer is permanently online, connected to a 1Gbit symmetrical fiber internet connection. It is on this machine that I run three
go-spacemeshnodes*, each accessing nearly 4TB of postdata on the three external SSD drives. - MacBook Pro running Smapp — I have a 2021 MacBook Pro, on which I run Smapp, but only to have a self-custodial wallet to receive, hold and send the SMH token. (It also runs the Hare protocol, and therefore is technically a “node”, but does not require dedicated postdata space, nor being online 24/7, and does not earn rewards.)
Considerations:
- Consolidated rewards —
go-spacemeshnodes can conveniently be configured to send their rewards to a common wallet address, which in my case is that running on the MacBook Pro. So all my rewards will arrive there. - Blockchain data size — Since both
go-spacemeshand Smapp run the Hare protocol, they both need to download the full blockchain data in a file calledstate.sql, which I have observed to grow from 8GB to 30GB during the single full month of December 2023! This data is stored on your computer’s startup drive, so consider that when choosing a computer on which to run Smapp orgo-spacemesh. (The team have acknowledged that managing this data growth is a top priority.)
Directory structure
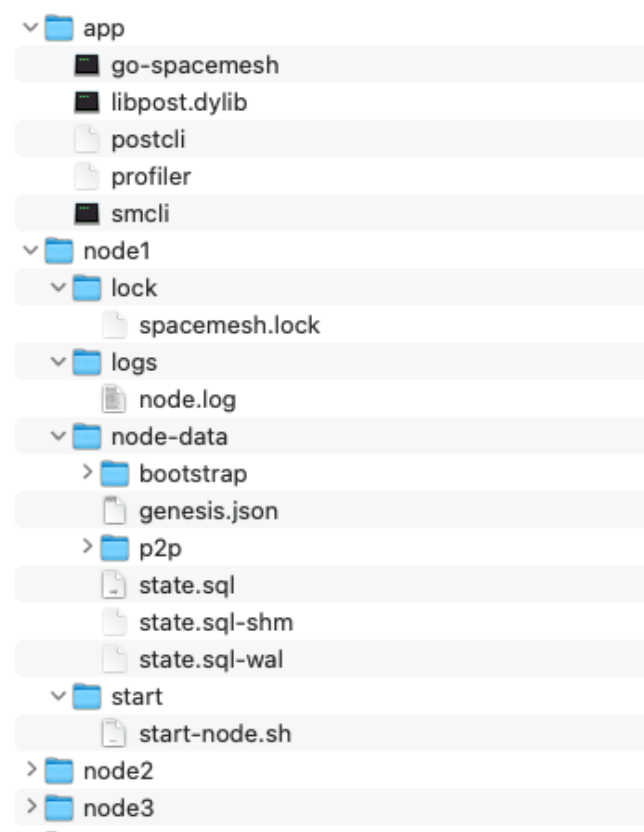
The following is what my directory structure looks like on the Mac Mini, running three go-spacemesh nodes:
Descriptions:
~/Spacemesh/app— This directory contains the latest release of thego-spacemeshandpostcliapps. You can download pre-built binaries from the “releases” section at GitHub, to avoid having to “build” them yourself. Finally, to get these to run under the MacOS’s security framework, you have to control-click each (includinglibpost.dylib) and click “Open” (you can’t just double-click them!) MacOS will advise you that you are opening an app from an unknown developer. Until you do this, they will not run.~/Spacemesh/node1/lock— This directory contains a filespacemesh.lockwhichgo-spacemeshwill lock while running.~/Spacemesh/node1/logs— This directory contains a filenode.logwherego-spacemeshwill log information.~/Spacemesh/node1/node-data— This directory is wherego-spacemeshwill continually write the blockchain data.~/Spacemesh/node1/start— This directory contains a filestart-node.shthat is run to start my node.~/Spacemesh/node2/— This directory is identical tonode1but with files related to the second node running on the machine.~/Spacemesh/node3/— This directory is identical tonode1but with files related to the third node running on the machine./Volumes/smesh1/postdata/— This Samsung T9 SSD external drive contains the postdata for node 1, used in the Proof-of-Space-and-Time part of the Tortoise protocol. In my case, I have approximately 3.5TB of data./Volumes/smesh2/postdata/— Same as above, but for node 2./Volumes/smesh3/postdata/— Same as above, but for node 3.
Creating postdata using a cloud provider
Creating postdata requires a GPU, and can take a very long time. At the time of this writing, the postdata creation process is incompatible with the GPU of the Mac Mini’s M2 processor, and to create 4TB of data using the M1 Max GPU in my MacBook Pro would have taken — over one month!
Fortunately, there are two cloud providers where you can rent powerful GPUs, allowing you to create your postdata much quicker. In my case, I was able to create my data in less than 24 hours.
- RunPod.io — The Spacemesh project has a community-contributed guide for using RunPod to create postdata. However, it involved connecting to an online GUI version of Linux to run Smapp, which reported NVIDIA driver problems I couldn’t solve. I ended up using the second option below, as I met someone to help me with the cloud-generation process. Now that I know how this is done, however, I would probably give RunPod another try if I had to start over.
- Vast.ai — Vast is a platform where people from all over the world offer their “GPU rigs” online for renting. I connected with a Spacemesh community Discord member—who, preferring to remain anonymous, I’ll just call “my friend”—who for $60 would run his custom-created multi-GPU
postclisoftware to create my postdata using the 8-GPU instance I created at Vast. In the instructions below, however, I’ll describe how to create the data yourself, using the project’s single-GPUpostclisoftware.
I’ll show a screenshot of the instance creation dashboard, followed by a step-by-step process of how it works.

Postdata creation process:
- Determine postdata size — First you need to determine the size of your postdata. Postdata size is specified in terms of “units”, each of which is 64 GiB. Notice that’s different from GB. A 4TB drive contains 3.64 TiB of space, and so if you specified 60 units as I did initially, it won’t fit, as (60)(64 GiB) = 3.84 TiB! So for my 4TB drive, I chose 55 units, given that (55)(64 GiB) = 3.520 TiB.
- Determine .bin file size — Your postdata is composed of many
.binfiles. You also need to choose the maximum size for those files. I chose34359738368, which is approximately 32GB, which means for 55 units of postdata, I’ll have 110 files, the first beingpostdata_0.binand the lastpostdata_109.bin. - Initialize the process locally — You need start the postdata creation process locally, in order to generate a file called
postdata_metadata.json, the contents of which you will need to run thepostclisoftware at Vast. To do this, you will start yourgo-spacemeshnode, as specified later in this article, and then stop it once yourpostdata_metadata.jsonfile has been created. - Super important — When you run
go-spacemeshfor the first time, in addition to apostdata_metadata.jsonfile, it will also create akey.binfile in your postdata directory. This file contains your unique node ID, and it’s very important you do not later overwrite this file, when downloading your Vast-created data. Without this file, your postdata proofs will not be accepted by the network! - Setup & rent an instance at Vast — Once you have stopped
go-spacemesh’s initial run locally at home, you’re ready to get going at Vast.- You need to enter your SSH key, or that of whoever is running the
postclisoftware for you, into your Vast account so that one can connect to your instance once you start it. - From the screenshot above, you can see on the left the
cuda:12.0.1-devel-Ubuntu20.04“template” I used, and gave it 4TB of disk space. - The available rentable instances will change continually, but here I would probably choose the first—with 8 GPUs, and the highest upload speed of 3,900 Mbps, which cost $6.50 per hour.
- You need to enter your SSH key, or that of whoever is running the
- Create your postdata — Once you have an instance up and running, you’re ready to create your postdata.
- SSH into your instance as root, and download the latest
postclifrom GitHub. (You can download the latest binary, from the “releases” area.) - You’ll need the latest network “ATX ID” which you can get by running this command on any sync’d node,
grpcurl -plaintext -d '' localhost:9092 spacemesh.v1.ActivationService.Highest | jq -r '.atx.id.id' | base64 -d | xxd -p -c 64In my case, I run this on my MacBook Pro, when Smapp is fully sync’d. (I had to use Homebrew to install thejqutility.) - You’ll need the HEX version of your node-id’s public key for the
{your_node_id}argument in the commands in the next step. There are two ways you can get this:- Run this command against your
key.binfile:cat key.bin | tail -c 64 - Copy the base64 version of your public key found in your
postdata_metadata.jsonfile, and cover it to HEX at this Base64-to-HEX conversion site.
- Run this command against your
- For each GPU accessible to the instance, you’ll need to run a separate
postcliprocess in parallel, each creating a subset of your postdata files. Since my instance had 8 GPUs, and my postdata size is 55 units, I would have issued the following eight commands: 1../postcli -numUnits 55 -maxFileSize 34359738368 -provider 0 -id {your_node_id} -commitmentAtxId {atx_id} -fromFile 0 -toFile 14 -datadir /root/spacemesh/storage/ &./postcli -numUnits 55 -maxFileSize 34359738368 -provider 1 -id {your_node_id} -commitmentAtxId {atx_id} -fromFile 15 -toFile 29 -datadir /root/spacemesh/storage/ &./postcli -numUnits 55 -maxFileSize 34359738368 -provider 2 -id {your_node_id} -commitmentAtxId {atx_id} -fromFile 30 -toFile 44 -datadir /root/spacemesh/storage/ &./postcli -numUnits 55 -maxFileSize 34359738368 -provider 3 -id {your_node_id} -commitmentAtxId {atx_id} -fromFile 45 -toFile 59 -datadir /root/spacemesh/storage/ &./postcli -numUnits 55 -maxFileSize 34359738368 -provider 4 -id {your_node_id} -commitmentAtxId {atx_id} -fromFile 60 -toFile 74 -datadir /root/spacemesh/storage/ &./postcli -numUnits 55 -maxFileSize 34359738368 -provider 5 -id {your_node_id} -commitmentAtxId {atx_id} -fromFile 75 -toFile 89 -datadir /root/spacemesh/storage/ &./postcli -numUnits 55 -maxFileSize 34359738368 -provider 6 -id {your_node_id} -commitmentAtxId {atx_id} -fromFile 90 -toFile 104 -datadir /root/spacemesh/storage/ &./postcli -numUnits 55 -maxFileSize 34359738368 -provider 7 -id {your_node_id} -commitmentAtxId {atx_id} -fromFile 105 -toFile 119 -datadir /root/spacemesh/storage/ &
- I could monitor the state of creation by simply issuing the command
ls /root/spacemesh/storage/.
- SSH into your instance as root, and download the latest
- Move data from Vast to Backblaze — Once your postdata is created, you’ll need to download all those
.binfiles to yourpostdatadirectory. Unfortunately, download speeds from Vast are pathetic. However, they do allow you to connect your instance to Backblaze, where data can be moved much faster, and then downloaded to your home quickly from Backblaze.- Create an account at Backblaze.
- Create an API key at Backblaze.
- Create a Backblaze B2 bucket.
- Create a cloud connect to Backblaze at Vast, using your API key.
- Start the sync process clicking the cloud icon on your GPU instance. Be sure to toggle the sync direction! By default it’s Backblaze→Instance, but that would be catastrophic, as you obviously want Instance→Backblaze!
- You don’t have to wait until the data creation process at Vast is finished, to start the cloud sync to Backblaze. It will sync new
.binfiles as they are created. - The sync process might occasionally get stuck and require restarting, and in your Backblaze bucket you might notice instances of multiple copies of the same files, with different sizes, that you may need to clean up via manual deletion.
- Once the postdata creation process at Vast is complete, and you’ve cleaned up any multiple-instance files at Backblaze, you can turn off the instance (but don’t delete it!) and run the cloud sync process one final time to ensure your Backblaze bucket has all of the postdata files. Since it won’t overwrite existing files, the sync will happen quickly, and you’ll be paying only for Vast data storage costs, rather than GPU service.
- Once all your data is on Backblaze, you can delete the instance at Vast.
- Download your postdata from Backblaze — To download all the
.binfiles from Backblaze to my Mac Mini, I used the MacOS SFTP client Transmit—which supports Backblaze B2—to synchronize my Backblaze bucket to thepostdatadirectory on my external SSDs.
Once that’s all complete, you’re ready to run your nodes!
Node startup scripts
Here are the contents of the start-nodes.sh script that launches my first node:
#!/bin/bash

/Users/mhenders/Spacemesh/app/go-spacemesh \
--listen /ip4/0.0.0.0/tcp/7515 \
-d /Users/mhenders/Spacemesh/node1/node-data \
--smeshing-opts-numunits 55 \
--smeshing-opts-maxfilesize 34359738368 \
--filelock /Users/mhenders/Spacemesh/node1/lock/spacemesh.lock \
--smeshing-opts-provider 0 \
--smeshing-coinbase {my_wallet_address} \
--smeshing-start \
--smeshing-opts-datadir /Volumes/smesh1/postdata \
--grpc-public-listener 0.0.0.0:9092 \
--grpc-private-listener 0.0.0.0:9093 \
--grpc-json-listener 0.0.0.0:9094
And to see the important differences, here’s the script that starts the second node:
#!/bin/bash

/Users/mhenders/Spacemesh/app/go-spacemesh \
--listen /ip4/0.0.0.0/tcp/7516 \
-d /Users/mhenders/Spacemesh/node2/node-data \
--smeshing-opts-numunits 55 \
--smeshing-opts-maxfilesize 34359738368 \
--filelock /Users/mhenders/Spacemesh/node2/lock/spacemesh.lock \
--smeshing-opts-provider 0 \
--smeshing-coinbase {my_wallet_address} \
--smeshing-start \
--smeshing-opts-datadir /Volumes/smesh2/postdata \
--grpc-public-listener 0.0.0.0:9192 \
--grpc-private-listener 0.0.0.0:9193 \
--grpc-json-listener 0.0.0.0:9194
Comments & observations:
- It’s important that the
listenandgrpcports are different for each node run on the machine. - The
smeshing-coinbaseargument contains the wallet address of Smapp running on my MacBook Pro. That’s where I want all of my rewards to end up.
Starting your nodes
In MacOS, scripts can be started (and kept alive) by MacOS’s launchd service, based on a .plist file located in ~/Library/LaunchAgents/. Running three nodes, here is the launchd startup file, com.spacemesh.node1.plist for node 1. Similar files exist for nodes 2 and 3.
<?xml version="1.0" encoding="UTF-8"?>
<!DOCTYPE plist PUBLIC "-//Apple//DTD PLIST 1.0//EN" "http://www.apple.com/DTDs/PropertyList-1.0.dtd">
<plist version="1.0">
  <dict>
    <key>Label</key>
    <string>com.spacemesh.node1</string>
    <key>Program</key>
    <string>/Users/mhenders/Spacemesh/node1/start/start-node.sh</string>
    <key>RunAtLoad</key>
    <true/>
    <key>KeepAlive</key>
    <dict>
      <key>Crashed</key>
      <true/>
    </dict>
    <key>StandardOutPath</key>
    <string>/Users/mhenders/Spacemesh/node1/logs/node.log</string>
	</dict>
</plist>
Simply moving these files into ~/Library/LaunchAgents/ isn’t enough; they needed to be “loaded” into the launchd. There are CLI commands to do this, but I prefer to use the app LaunchControl, which makes this easier, and also helps with any troubleshooting or syntax error detection.
Monitoring your nodes
For this, I use Keyboard Maestro to, once per hour, run the following commands on the Mac Mini, and email me if any problems are discovered.
(You will need to use Homebrew to install the grpcurl utility on your Mac.)
The first checks that the node is in sync (by comparing the current vs latest-validated “layers”), and the second just confirms that I’m “smeshing” (participating in the Tortoise protocol, to earn rewards.)
grpcurl --plaintext -d "{}" localhost:9092 spacemesh.v1.NodeService.Status
grpcurl --plaintext -d "{}" localhost:9093 spacemesh.v1.SmesherService.IsSmeshing
I also use Keyboard Maestro to keep an eye on the size of ~/Spacemesh/node1/node-data/state.sql, the file which contains the blockchain data, in case it gets to a point threatening the free space remaining on the Mac’s startup drive.
Another command that’s useful, which I run manually, to observe smeshing related events is the following:
grpcurl --plaintext localhost:9093 spacemesh.v1.AdminService.EventsStream
Other interesting API calls can be found in this document by community contributor, “repost”.
A note about earning rewards…
At the time of this writing, there’s several aspects of the smeshing process timeline that I still do not fully understand. For example, the Spacemesh protocol operates in two-week “epochs”. In order to earn rewards, your node has to compute and submit space and time proofs during the current epoch, which makes it eligible to receive rewards in the subsequent epoch.
(As an aside, the space proof is performed through a CPU-based computation that requires reading your entire postdata within a window of 12 hours. For that reason, I’m using external SSDs instead of platter disks.)
Given the various network events that happen from the time you initially run your node with your full postdata available, you won’t be eligible to receive rewards until approximately three weeks later.
Log rotation
go-spacemesh will write a lot of data to your log file, and so it might be useful to setup automatic log rotation. Following are directions for rotating go-spacemesh log files running on MacOS. Assumes you have the Homebrew package manager installed, for installing Unix utilities.
The paths are relevant for Homebrew running on Apple Silicon (they will differ on Apple Intel machines). All commands are run from the terminal.
Step 1: Install logrotate
-------------------------
brew install logrotate

Step 2: Create logrotate's configuration folder
-----------------------------------------------
mkdir /opt/homebrew/etc/logrotate.d

Step 3: Create each node's log rotation configuration
-----------------------------------------------------
touch /opt/homebrew/etc/logrotate.d/spacemesh_node1.conf

Step 4: Edit the configuration file (my editor is BBEdit)
---------------------------------------------------------
bbedit /opt/homebrew/etc/logrotate.d/spacemesh_node1.conf

/Users/mhenders/Spacemesh/node1/logs/node.log {
  daily
  copytruncate
  rotate 5
  size 100M
  compress
}

Step 5: Create a folder that logrotate needs
---------------------------------------------
mkdir /opt/homebrew/var/lib/

Step 6: Test it to confirm it works
-----------------------------------
logrotate -v -f /opt/homebrew/etc/logrotate.d

Step 7: Create a service to start logrotate on startup
------------------------------------------------------
brew services start logrotate

This will create the following file:
~/Library/LaunchAgents/homebrew.mxcl.logrotate.plist

And finally, if you need to restart logrotate:

brew services restart logrotate
Public & private node setup
If you run multiple nodes, it can make sense to limit only one to be a “public” node, while making the others all “private”. When setup properly, only the public node will experience high-bandwidth and memory usage.
I described my setup in this document which was shared in the project Discord’s “Community Contributions”.
Running a single node with go-spacemesh 1.4
Version 1.4 of go-spacemesh introduced a feature allowing a single node to manage multiple postdata sets. This greatly reduces the storage requirements for running a single node, from four state.sql files, to a single one.
I described my migration in this document which was shared in the project Discord’s “Community Contributions”.
Costs
Just summarizing the costs involved in my setup (Although I spoke of one Mac Mini in this article, I’m also running one additional node on another older Mini I had, so I actually have four 4TB SSDs, and a total 16TB of total data):
- 2023 Mac Mini M2 Pro, 32GB/1TB, $2,500.
- Samsung SSDs, 4*$450 = $1,800.
- Vast Rentals, 4*$150 = $600.
- My friend, 4*$60 = $240.
- TOTAL: $5,140
At the time of this writing, one earns approximately 2 SMH per day per TB of postdata, so I should be earning 32 SMH, or $64 per day, at the current price of ~$2.00—which should result in breaking even in about 2.5 months.
Final thoughts
In this article, I’ve described the process I followed to run multiple Spacemesh nodes on MacOS computers at home, all sending their rewards to a single wallet running on my MacBook Pro. (And I’ll continue to update this article based on feedback I receive.)
As mentioned at the start, if there’s space for another L1 blockchain in crypto, I think Spacemesh is uniquely positioned to compete—in terms of technology, team and community—and for that reason I’m invested and increasingly active in the project.
Acknowledgements
Running my nodes wouldn’t have been possible without the help of a number of community members in the project’s Discord who have been very kind and generous with their time.
- Lane — Spacemesh co-founder. I love how he thinks, and how he writes. I wouldn’t be as bullish on Spacemesh without him at the helm.
- My anonymous friend — Probably among the least known, but most knowledgable people in the project.
- TickTockBent — Great writer and communicator, very patient in helping people understand this complex protocol.
- Cipoint — Another great communicator, with seeming unlimited patience.
- HakeHardware — Produces an endless stream of video content, and also very helpful and patient with people.
- And too many others to mention… — While the above have been particularly helpful to me personally, the Discord has a large and active set of moderators and contributors, who all volunteer their time to help the community.
Additional reading & resources
Finally, for those interested in learning more about Spacemesh, here’s a few recommended articles and useful resources.
- Why you should invest in Spacemesh (Lane Rettig) — A co-founder’s reflection on the project.
- The Spacemesh Consensus Protocol (Aviv Eyal) — First of a 3-part blog post is intended for a technical audience who would like to understand the Spacemesh consensus protocol.
- The Spacemesh Economic Model (Team Spacemesh) — The project’s overview of its tokenomics model.
- Blockchain Economics Revisited (Lane Rettig) — An insight into Lane’s views on blockchain economics and governance.
- Smesher Guide (GitHub) — A much more detailed document discussing the protocol operation, particularly focusing on mining (earning rewards).
- Understanding Spacemesh: A Guide to Key Terminology (TickTockBent) — Great overview of Spacemesh terms and protocol events.
- Spacemesh Explorer — The official project explorer.
- Instructions for using postcli (GitHub) — Self-explanatory.
- Tater Tracker — A webapp provided by community member HakeHardware for exploring various operational elements of Spacemesh.
- Spacemesh Rewards Tracker — Mobile app for iOS and Android, by community member BVale, providing essential network information.
Enjoy this article? — You can find similar content via the category and tag links below.
- Categories — Crypto, Technology
- Tags — Spacemesh
Questions or comments? — Feel free to email me using the contact form below, or reach out on Twitter.